Saturday, January 29, 2022

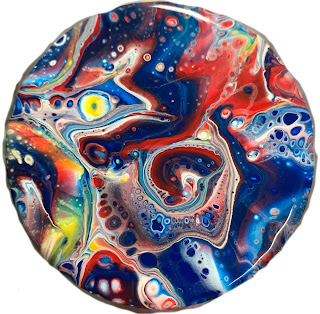
 Yikes - It's almost the end of January and I just realized that I haven't posted since Christmas! It is perhaps a little late for be wishing everyone a Happy New Year, but here is a photo of an acrylic pour with a candle and two champagne glasses....welcoming 2022.


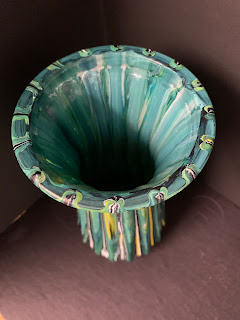
This new year is bringing some medical challenges in our family and I have been tied up with various appointments. However, whenever I can, I get into my shop for a little 'art therapy.' I put on some music, get out my paints and I am transported into another world. Here is a vase that I completed recently. It began with red, blue, beige, white and green. It's freshly poured in this photo and continued to drip and change for quite a while.

I was very surprised when I returned to it the next day. Most of the darker blue and deep red had disappeared and green and orange took over! Before putting resin on it, it looked like this.


 Here is the finished vase.

The larger pieces obviously take a longer time and sometimes my time is limited so I have been doing more smaller pours. These two square candle holders were fun to do and look wonderful when lit.


Friends of mine are 'supporting my habit' and have given me a box of 72 small glass votives. I learn something new with each one and have enjoyed experimenting with color and different ways of pouring. Here are just a few in various stages  - the ones in the back have a first coat of resin. The ones in the front awaiting their first coat.

One of my discoveries was using my heat gun to add additional sparkle/crackle to the paint. When the candles are lit, they are quite dramatic. 


It's been a lot of fun...and as long as that continues, I'll keep experimenting...and then keep posting!


Saturday, December 25, 2021

"Bittersweet"

 I have always loved the bittersweet vine. Usually I think of it around Thanksgiving. It was always fun to decorate our Thanksgiving table with the vine. I love the colors and the shapes. 

This has been a challenging year in many ways. In addition to COVID restrictions and uncertainties, some family medical issues have kept us busy running to doctor's appointments. For the past several months we were not sure that we would be celebrating this holiday season at all - but how grateful and blessed we are feeling to have this time together. 

So, when I was thinking of a card for this Christmas all I could think about was 'bittersweet.' It doesn't look as holiday-like, but it conveys a feeling that a lot of people share around this time of year. It's a time of reflection, of Christmases past, and of times of joy and sadness. It is truly a bitter-sweet time.

Merry Christmas everyone. Take the time to treasure the moments we all have and to make memories for the times to come.


Saturday, December 4, 2021

Watercolor magic

 It's that time of year - the St. Michaels Art League hangs a watercolor exhibit at our local library each December. (except last year...COVID restrictions kept the library closed)

Years ago I had 'promised' myself that I would try to put something in every exhibit that the art league put on. So, even though I haven't been using watercolor lately, I needed to get back to it!  Since I have enjoyed the looseness of acrylic paint pouring, I knew I didn't want to go back to realistic scenes of Maryland's Eastern Shore. What to paint?

One of the best ways of creating something new would be to get out my Yupo paper and experiment with it. I began with wetting the paper and dropping color onto it. I love watching to see what the paint will do. This was my first attempt.


It was fun to do and did loosen me up. When I showed it to my art group, they politely said things like "It looks like a salad." They particularly liked the green. OK, I would play with that. I began adding more greens and filled in all the white spaces. Maybe a salad in a wooden bowl. I could add wooden serving fork and spoon...let them go out of the painting onto the mat...  So, I played with it a little...  I put a little paint around for a bowl and then tried some scrap paper cutouts of fork and spoon.  The more I 'took it over' the less I liked it!


Time to get out another sheet of Yupo! This time I wet the paper and washed over it with different greens and blues. It turned out mostly green. While it was very wet, I just began making circular shapes with my paint brush - having no idea what was happening. I let it dry thinking I would go back to it and add some other colors. When I showed this to my group... they were again polite. They saw various things including fields..maybe ready for harvest? It really wasn't meant to be anything at that point.

The following day, I began to dab various colors of paint on it just to see what would happen. The wonderful thing about Yupo is that you can wash it off completely, so what did I have to lose? I dabbed the paint here and there and then blotted it off with a tissue. I was having such fun! The tissue got wetter and wetter...  Then I 'let er rip' and began to swipe with the wet tissue. It picked up the paint leaving some wonderful ragged edges. I liked what was happening....it was hard to stop!
I'm calling this "Fall into Winter." 
It makes me think of a snowy winter wind blowing the fall leaves.

I wanted to put two paintings in the exhibit so I had one more to work on... The next day I went a little crazy and experimented with the watercolor to see if I could get it to pour like acrylic paint. Well, no it doesn't. I wet the paper and started blobbing on color. It wasn't wet enough to do much so I sprayed it with my water misting bottle. I held the paper up vertically, added more paint here and there and watched the paint run. What a mess! I kept adding paint in various places, trying to balance lights and darks. Knowing that watercolor dries lighter (and knowing that I could wipe it all off the next day and begin again), I decided to walk away and take a look 24 hours later.


The next morning I looked at it and wondered what to do with it. Hmmm, I looked around. Our house has hardwood flooring throughout. I looked at the painting and looked at the floor. I love seeing the hardwood grain... what about making some 'grain' in the painting?

This is where Yupo is really fun. I got out some toothpicks, a bowl of water and some tissues. What if I wet a toothpick and trace about the painted shapes... and then blot the wet lines... Voila! 

I found the zone...  this painting met my need to let go (letting the paint go where it wants) and get back some control (outline the shapes)! As I 'erased' the paint, I kept putting a mat around it to pick out the parts that I wanted keep. You can see this side-by-side photo and pick out the shapes.
Here is a larger version of the finished painting.
I'm calling this one "Fantasy Garden."

The watercolor exhibit will be hanging at the St. Michaels Library during the month of December.


Saturday, November 20, 2021

A few more pours...

 When I first got excited about pouring paint over glass, I poured over all sorts of things. I had unused vases on a closet shelf. Friends gave me several vases and jelly jars. I wanted to try different glass shapes and walked around a dollar store. I did some online shopping and found some miniature vases...

All this brings me to wonderful experimenting...trying different ways of pouring - layered paint out of a cup, drops of color here and there, swirling it around as I pour, adding drips in some places...manipulating the paint in addition to straight pouring. 

Here are a few more experiments...along with images of some of the vase/jar bottoms. 

I was in a Christmas mood for this bud vase. It was tricky because it's fluted and the paint only wants to run down the 'valleys.' I found that I have to coax the paint to cover the raised parts. 

Love this bottom! Almost want to just turn it upside down.

Here's another holiday color one.  I used a lot of silicone oil in the paint so it's full of 'cells' and really sparkles with a candle lit in it.

This one is that same shape - could be a candle holder or a candy dish. 
Take a look at its bottom!

A few more different shapes with their bottoms...

Now, to back up a bit...some people have asked how I do all this painting upside down. Part of the fun for me is figuring out how to make a jig that is stable enough for each vase . I have used different size  cups, spray paint cans and various size dowels fitted into pieces of wood. It always depends on the size and height of the vase. Take a look at some of these vases waiting for a coat of resin. I am loving all the drip patterns on the wooded blocks and will find something to do with them one day!


Yesterday, I went again to our local library and added more vases to the display cases. 


Stop by and take a look.  

Saturday, October 23, 2021

Pouring over glass - artwork on display!

 Yes, I have become obsessed by this new (to me) art form. It's the most wonderful distraction from the world around me...and so much fun!

Here are a few more of my recent pours:

This first one... I love the shape of this vase and wanted to make it bright and distinctive. I used a bright red and blue and a dark green. As I poured I was really excited about how it looked. However, when it dried, it was very dull. Now, I know that this acrylic paint dries dull, so I thought I would just sprinkle some water on it (before I put the resin on) and see if it would brighten. It did! I loved it...until I touched it and found the paint washing off!

Not one to give up, I tried it again. Same result - it dried dull. This time I waited a few days and then put on a coat of resin. Ugh - I thought it was very dark and boring. 

Interesting, you can see all the bright colors in the drips, but the vase is really dull. My artist friends seems to like it that way. I wasn't so sure and just put it aside.  As few weeks later, I still didn't like it and started picking away at the resin. I found that I could peel it all off! 

This time I left out the dark green and added white to the mix of red and blue. I alternated the three colors in a cup and began to pour.  Look at the difference!

And here is what happened on the bottom!


It looks like I had some yellow in there which I had forgotten about! 

I am excited about its new look.

Here are just a few more: these photos show the wet paint before resin...and,

I can't resist showing you some of the bottoms!


This is a Ball jar - fun!


I mentioned in my last post that I had spoken to the director of our local library about displaying these pieces of art. Yesterday, I took 22 of them and put them in the empty cases in the gallery area of the St. Michaels Library! So excited to have them out there for everyone to see. I turned some of them upside down so you could see the surprise on the bottoms! (Sorry about the reflected light in the photo. It's a sunny hallway)


They will be there - and are available for purchase - at least through the month of November! Stop by the library at 106 Fremont St. in St. Michaels.


Saturday, October 9, 2021

Pouring over glass - some more!

 As crazy as this sounds, I seem to be finding my sanity in pouring paint over glass these days! Here are a few more that I have experimented on.  

I love the shape of this vase - it's about 5"-6" tall. It was hard to find a way to turn it over so I could pour over it. I finally found a bottle that would hold it straight...but after I poured paint on it, I discovered that the lip would be sticking to the bottle. I quickly looked around my shop to see what I could use to fix this situation and found a packet of sawtooth hangers! I was able to slip several of them around the base of the pour (actually the lip of the upside down vase). It was just enough space so that the vase didn't stick to the plastic bottle!


I like the look of this one...particularly the inside.


This one is a 12" tall vase. It was a little tricky to find some way to turn it upside down and not have it fall over. I discovered that the plastic bottle that I had used before also worked for this one! Fortunately, the top of this vase (which is at the bottom of this picture) curved out so the lip of the vase wouldn't be touching the bottle this time.

This was also a little difficult because the vase was fluted and made 'hills and valleys' instead of just curved glass. I poured different colors at intervals to see where they would go. Toward the end of the pouring I put dots of white and yellow and encouraged the paint to run down in the valleys. 

Here it is right side up before putting on the resin.


It also made an interesting design on the lip.

And, I love the surprise that showed up on the bottom!


This vase did not photograph well - weird angles I think. It is actually a straight glass vase. It is resting on the top of a spray paint can that has a wooded block on it to make it higher. Notice the paint drips on the wax paper. So interesting!

Here are a couple of views before it had resin on it. Picture this as a straight glass...


Here is a photo of the above three as finished product.


This is the last one (for today - there are many more to come - I can't stop!) It is - so far - my favorite. It was one of the first ones that I did. I wish I could remember exactly how I did it. I was so excited about the whole new idea that I didn't pay attention. It is a large, pretty nondescript standard florist vase. It is upside down on a spray paint can... note the drips. 

I just started pouring, It does have some silicone in the pouring medium - wait until you see the close ups! This paint is very wet... compare with the next photo.

Notice how flat the dry paint looks.

Here are a couple of close ups. 


This is the finished vase from two different angles! 
Maybe you can understand why it continues to be my favorite.


As an aside: Last week I was in the St. Michaels Library and had an interesting conversation with Shauna Beulah - the Branch Manager. She had seen some of these vases on line and pointed out the empty display cases along the gallery wall. I may be able to put some of this artwork there so you can see it up close. I'll let you know when...