As crazy as this sounds, I seem to be finding my sanity in pouring paint over glass these days! Here are a few more that I have experimented on.
I love the shape of this vase - it's about 5"-6" tall. It was hard to find a way to turn it over so I could pour over it. I finally found a bottle that would hold it straight...but after I poured paint on it, I discovered that the lip would be sticking to the bottle. I quickly looked around my shop to see what I could use to fix this situation and found a packet of sawtooth hangers! I was able to slip several of them around the base of the pour (actually the lip of the upside down vase). It was just enough space so that the vase didn't stick to the plastic bottle!
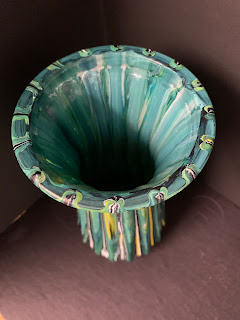
I like the look of this one...particularly the inside.
This one is a 12" tall vase. It was a little tricky to find some way to turn it upside down and not have it fall over. I discovered that the plastic bottle that I had used before also worked for this one! Fortunately, the top of this vase (which is at the bottom of this picture) curved out so the lip of the vase wouldn't be touching the bottle this time.
This was also a little difficult because the vase was fluted and made 'hills and valleys' instead of just curved glass. I poured different colors at intervals to see where they would go. Toward the end of the pouring I put dots of white and yellow and encouraged the paint to run down in the valleys.

Here it is right side up before putting on the resin.
It also made an interesting design on the lip.
And, I love the surprise that showed up on the bottom!
This vase did not photograph well - weird angles I think. It is actually a straight glass vase. It is resting on the top of a spray paint can that has a wooded block on it to make it higher. Notice the paint drips on the wax paper. So interesting!
Here are a couple of views before it had resin on it. Picture this as a straight glass...
Here is a photo of the above three as finished product.
This is the last one (for today - there are many more to come - I can't stop!) It is - so far - my favorite. It was one of the first ones that I did. I wish I could remember exactly how I did it. I was so excited about the whole new idea that I didn't pay attention. It is a large, pretty nondescript standard florist vase. It is upside down on a spray paint can... note the drips.
I just started pouring, It does have some silicone in the pouring medium - wait until you see the close ups! This paint is very wet... compare with the next photo.
Notice how flat the dry paint looks.

Here are a couple of close ups.


This is the finished vase from two different angles!
Maybe you can understand why it continues to be my favorite.
As an aside: Last week I was in the St. Michaels Library and had an interesting conversation with Shauna Beulah - the Branch Manager. She had seen some of these vases on line and pointed out the empty display cases along the gallery wall. I may be able to put some of this artwork there so you can see it up close. I'll let you know when...


No comments:
Post a Comment